Installing and Setting up perf on NVIDIA Jetson Orin Nano
Background
대충 또 젯슨이 문제라는 이야기..
perf를 사용하기 위해 필요한 dependency가 있는데, 이 부분이 apt 패키지 안에 없어서 일반적인 ubuntu pc에서 사용하는 것처럼 perf를 설치할 수 없다.
When trying to use perf on Jetson Orin Nano with a custom Tegra kernel (5.10.216-tegra), the standard Ubuntu repositories lack the appropriate linux-tools package. Therefore, building perf from the source specifically matching the kernel is required.
아래 글은 nvidia developer forum (http://forums.developer.nvidia.com/t/installing-linux-performance-monitoring-tools-on-jetson-tx2/61365/6 )을 서치하던 중 steven의 답글에서 많은 도움을 받았다.
고마워요 따봉 스티븐씨!
Step-by-step Installation
Step 1: Install Necessary Dependencies
sudo apt update
sudo apt install -y flex bison libelf-dev libdw-dev libiberty-dev libnuma-dev libperl-dev
Step 2: Download NVIDIA Kernel Source for Jetson (L4T) (Jetson용 NVIDIA 커널 소스(L4T) 다운로드)
mkdir ~/l4t && cd ~/l4t
wget https://developer.nvidia.com/embedded/l4t/r35_release_v1.0/sources/public_sources.tbz22번째 줄의 wget에서는 반드시 내 젯슨의 릴리즈 버전을 확인하고 올바른 링크로 파일을 받아줘야 한다.
https://developer.nvidia.com/embedded/downloads
Jetson Download Center
No downloads meet your criteria.
developer.nvidia.com
위 사이트에서 올바른 젯슨 버전을 검색해서, Jetson Linux xx.x를 참고하거나,
https://developer.nvidia.com/embedded/jetson-linux-r351
Jetson Linux 35.1
NVIDIA® Jetson™ Linux Driver Package is the board support package for Jetson. It includes Linux Kernel, UEFI bootloader, NVIDIA drivers, flashing utilities, sample filesystem based on Ubuntu, and more for the Jetson platform. NVIDIA Jetson Linux 35.1 Je
developer.nvidia.com
위 링크에서 릴리즈 버전에 맞게 숫자만 수정하여 들어가도 된다.
해당 페이지에서 Driver Package Sources를 찾아 링크를 얻으면 된다.
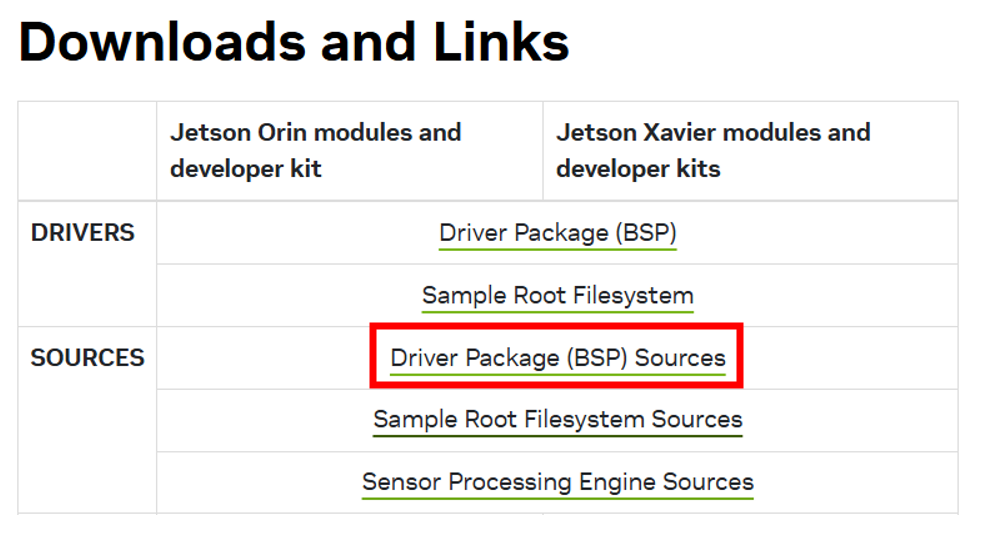
wget대신 컴퓨터에 다운받고 파일을 옮겨도 무방하다.
그 후 아래의 명령으로 압축을 해제해준다.
tar -xjf public_sources.tbz2
tar -xjf Linux_for_Tegra/source/public/kernel_src.tbz2
cd kernel/kernel-5.10/tools/perf
Step 3: Build perf from Source (소스에서 perf 빌드하기)
Inside kernel/kernel-5.10/tools/perf:
make
sudo make install
This compiles and installs perf to /usr/bin/perf by default....
보통 알아서 install까지 되어야하는데 makefile에 따로 정의되어있지 않았는지 자동으로 되지 않았다.
그래서 아래의 방법을 이어갔다.
Resolving Issues with Default perf Path (기본 perf 경로 문제 해결)
After installation, running perf might still reference the incorrect version:
perfThis command may trigger warnings like:
WARNING: perf not found for kernel 5.10.216This occurs because the system calls the old default perf.
Solution: Change perf to the Newly Built Version
Copy the built perf binary into /usr/local/bin (which takes precedence over /usr/bin):
sudo cp ./perf /usr/local/bin/perfClear shell cache if necessary:
hash -rVerify the change:
which perf
# Should output: /usr/local/bin/perf

perf --version
# Should run without any warnings
Final Verification
Your newly compiled and installed perf tool should now be operational without issues.
Run a simple test to ensure functionality:
perf stat lsNote: Avoid overwriting system binaries in /usr/bin directly to prevent unintended system issues. Always prefer using /usr/local/bin or shell aliases.